2. Ubuntu代理配置
2.1. V2ray简介
Project V 是一个工具集合,它可以打造专属的基础通信网络。Project V 的核心工具称为 V2Ray,其主要负责网络协议和功能的实现,与其它组件通信。V2Ray 可以单独运行,也可以和其它工具配合,以提供简便的操作流程。
其官网链接为 www.v2ray.com (需要翻墙)。
V2ray 主要特性:
- 多入口多出口 : 一个
V2Ray进程可并发支持多个入站和出站协议,每个协议可独立工作。 - 可定制化路由 : 入站流量可按配置由不同的出口发出。轻松实现按区域或按域名分流,以达到最优的网络性能。
- 多协议支持 :
V2Ray可同时开启多个协议支持,每个协议可单独设置传输载体。V2ray支持的协议和传输载体如下:
| V2ray支持的协议 | V2ray支持的传输方式 |
|---|---|
| Blackhole | TCP |
| Dokodemo-door | mKCP |
| Freedom | WebSocket |
| MTProto | HTTP/2 |
| Socks | DomainSocket |
| VMess | QUIC |
- 隐蔽性:
V2Ray的节点可以伪装成正常的网站,将流量与正常的网页流量混淆,以避开干扰。 - 反向代理: 通用的反向代理支持,可实现内网穿透功能。
- 多平台支持: 原生支持
Windows、Mac OS、Linux,第三方支持移动平台。
2.2. V2ray配置系统代理(必须)
2.2.1. V2ray安装
sudo apt install --no-install-recommends curl           # 安装 curl
curl -O https://raw.githubusercontent.com/v2fly/fhs-install-v2ray/master/install-release.sh   # 下载 V2ray 官方安装脚本
sudo bash install-release.sh    # 运行安装脚本,脚本会从github上下载 V2ray Core
rm v2ray_install.sh             # 删除安装脚本
sudo systemctl enable v2ray     # 激活 V2ray服务
sudo systemctl start v2ray      # 启动 V2ray服务
sudo systemctl status v2ray     # 查看 V2ray服务状态
如果在运行安装脚本的时候下载速度很慢,可以自行先去github上下载 V2ray core, 网址为 https://github.com/v2ray/v2ray-core/releases,
下载最新版本的 v2ray-linux-64.zip。
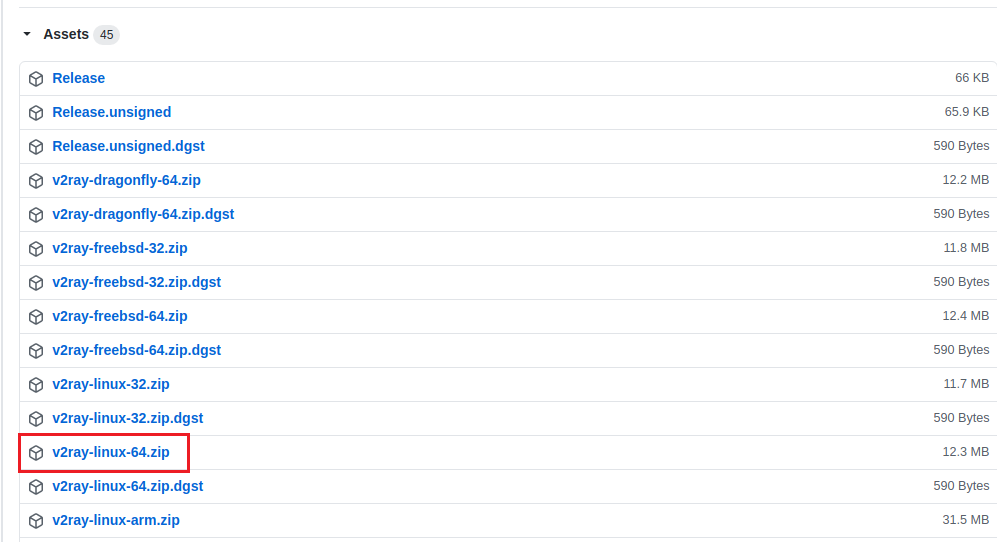
浏览器默认会下载文件到 ~/Downloads 文件夹下,之后运行:
sudo bash install-release.sh -l ~/Downloads/v2ray-linux-64.zip   # 运行安装脚本,脚本从本地安装 V2ray Core
rm v2ray_install.sh                 # 删除安装脚本
rm ~/Downloads/v2ray-linux-64.zip   # 删除 V2ray core 安装包
sudo systemctl enable v2ray         # 激活 V2ray服务
sudo systemctl start v2ray          # 启动 V2ray服务
sudo systemctl status v2ray         # 查看 V2ray服务状态
安装脚本会自动安装以下文件:
| /usr/local/bin/v2ray/v2ray | V2Ray 程序 |
| /usr/local/bin/v2ray/v2ctl | V2Ray 工具 |
| /usr/local/etc/v2ray/config.json | 配置文件 |
| /usr/local/share/v2ray/geoip.dat | 数据文件 |
| /usr/local/share/v2ray/geosite.dat | 域名数据文件 |
| /var/log/v2ray/ | 日志目录 |
| /etc/systemd/system/v2ray.service | 开机自启动文件 |
2.2.2. 修改V2ray服务状态
sudo systemctl status v2ray.service     # 查看 V2ray 服务状态
sudo systemctl start v2ray.service      # 启动 V2ray 服务
sudo systemctl restart v2ray.service    # 重启 V2ray 服务
sudo systemctl stop v2ray.service       # 停用 V2ray 服务
sudo systemctl disable v2ray.service    # 卸载 V2ray 服务
2.2.3. V2ray卸载
curl -O https://raw.githubusercontent.com/v2fly/fhs-install-v2ray/master/install-release.sh   # 下载卸载用的脚本,和安装脚本是同一个
sudo bash install-release.sh --remove     # 卸载 V2ray 服务
sudo systemctl disable v2ray              # 停止 V2ray 服务
sudo rm -rf /usr/local/etc/v2ray/         # 删除 配置文件
sudo rm -rf /var/log/v2ray/               # 删除 日志
2.2.4. V2ray客户端配置
修改 /usr/local/etc/v2ray/config.json 配置文件,和服务器端对接,以实现代理功能。由于服务器端使用的是 WebSocket + TLS 模式,因此配置参考如下:
{
  "inbounds":[
    {
      "port": 1080,
      "listen":"127.0.0.1",
      "protocol":"socks",
      "sniffing": {
        "enabled": true,
        "destOverride": ["http", "tls"]
      },
      "settings":{
        "auth":"noauth",
        "udp": true,
        "ip":"127.0.0.1"
      },
      "tag":"socket-in"
    },
    {
      "listen":"127.0.0.1",
      "port": 8118,
      "protocol":"http",
      "settings":{
        "timeout": 300,
        "allowTransparent": false,
        "userLevel": 0
      },
      "tag":"http-in"
    }
  ],
  "outbounds":[
    {
      "protocol":"vmess",
      "settings":{
        "vnext":[
          {
            "address":"服务器绑定域名",
            "port":443,
            "users":[
              {
                "id":"服务器的uuid",
                "alterId":233
              }
            ]
          }
        ]
      },
      "tag":"out-0",
      "streamSettings":{
        "network":"ws",
        "security":"tls",
        "wsSettings":{
          "path":"/"
        },
        "tlsSettings":{
          "serverName":"服务器绑定域名"
        }
      }
    }
  ],
  "routing":{
    "domainStrategy":"IPOnDemand",
    "rules":[
      {
        "type":"field",
        "ip":[
          "geoip:private"
        ],
        "outboundTag":"direct"
      }
    ]
  }
}
该文件中高亮部分需要按照自己的服务器配置填写。
在配置文件中定义了如下信息:
inbounds(入口): 监听本地的 socks5://127.0.0.1:1080 和 http://127.0.0.1:8118 端口数据。outbounds(出口): 监听到的本地信息以vmess协议发送到服务器绑定域名。routing(路由):当匹配时碰到任何基于IP的规则,将域名立即解析为IP进行匹配。
使配置文件生效需要重启系统或者重启 V2ray 服务:
sudo systemctl restart v2ray.service # 重启 V2ray 服务
Important
V2ray 代理有时间校验机制。如果服务器为北京时间,则本地机器也要保证系统时间为北京时间
2.3. 浏览器使用代理(必须)
2.3.1. 使用全局代理
开启 Ubuntu Network 的全局代理: 在 Ubuntu 的 Settings 中,选择 Network ,修改 Network Proxy 为 Manual,
设置其中的 Socks Host 地址为 127.0.0.1,端口号为 1080。 可以通过访问 谷歌 来测试代理。
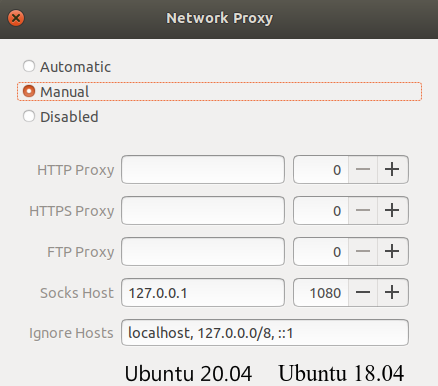
使用全局代理会使得访问所有网站都通过代理的方式访问,这样使得原本可以直接访问的网站,如百度,访问速度变慢。
2.3.2. 使用PAC代理-SwitchyOmega插件
PAC 文件包含了用户访问网站的规则,PAC 代理根据这些规则使用特定的代理或者直接访问网站。 SwitchyOmega 是 Chrome 浏览器的一个管理代理的插件,其配置步骤如下:
- 打开Ubuntu系统全局代理 : 见上一节。
- 从Chrome 应用商店下载安装
SwitchyOmega: 下载地址 - 打开
Chrome, 点击右上角的SwitchyOmega的图标,再点击Options(选项) - 选择
proxy选项,在Proxy servers中修改代理为socks5代理,地址127.0.0.1,端口1080,如下图所示:

这里也可以使用 HTTP 代理, 地址 127.0.0.1, 端口号 8118。
- 选择
auto switch选项,点击Add a rule list,在Rule List URL中填入的地址为网络防火长城列表,改成如下图所示:
https://raw.githubusercontent.com/gfwlist/gfwlist/master/gfwlist.txt
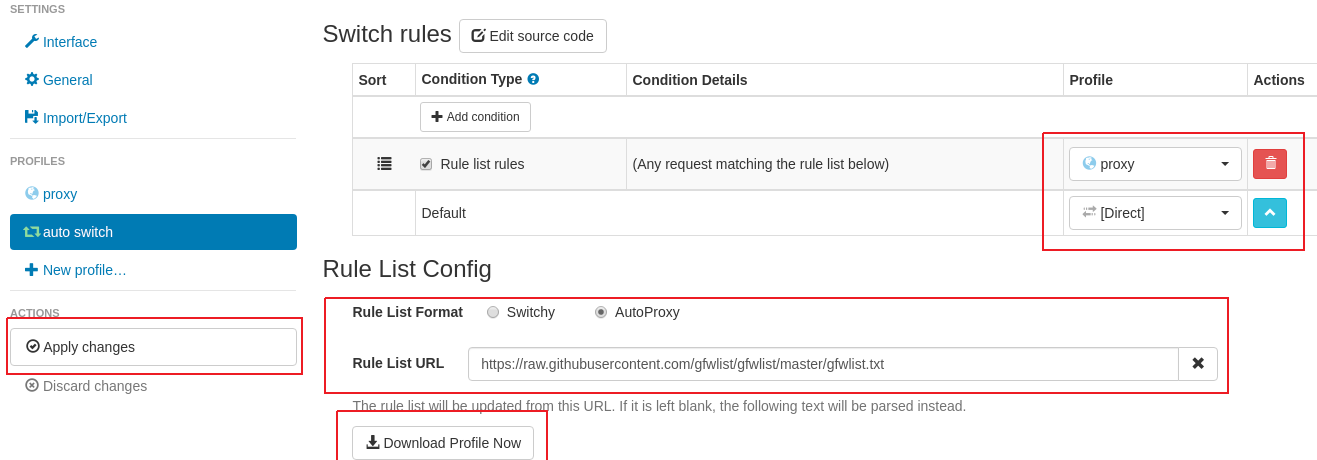
- 点击
Download Profile Now,下载防火长城列表。点击Apply changes,保存修改。 - 点击
Chrome浏览器右上角的SwitchyOmega的图标,选择模式为auto switch模式:
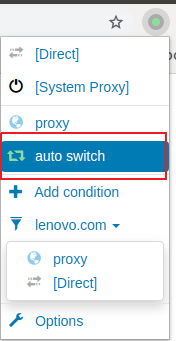
- 关闭Ubuntu全局代理: 在开启
Ubuntu全局代理的Network Proxy中选择Disabled:
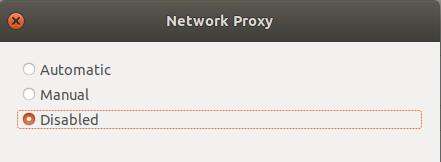
现在处于网络防火长城中的网站将通过代理访问,其他网站将直接访问。 同样的可以通过访问谷歌(https://www.google.com/) 测试代理。
2.3.3. 灵活使用 SwitchyOmega
虽然部分国外网站可以直接访问,但是访问速度很慢,例如很多公开的数据集网站,直接访问下载速度很慢,可以用过代理进行加速。
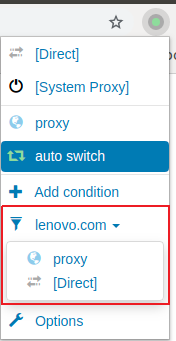
- 如果在浏览网页时需要 临时修改该网页的代理方式,则点击
SwitchyOmega的图标,点击网站域名,选择代理方式,重新加载网页:
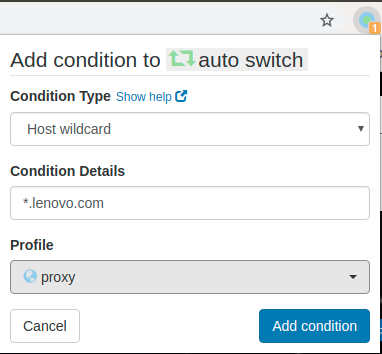
- 如果想要 永久修改该网页的代理方式,则点击
SwitchyOmega的图标,点击Add condition,在Profile中选择代理方式,点击Add condition即可:
2.4. git 使用代理
git clone 代码时,由于有些代码的源在国外,clone 的速度特别慢。在配置好了 V2ray 网络代理后,可以让 git 使用 socks 代理 或者 http 代理进行加速,二者选一个即可。
2.4.1. git 全局代理
# 设置 socks5 全局代理
git config --global http.proxy socks5://127.0.0.1:1080
git config --global https.proxy socks5://127.0.0.1:1080

# 设置 http 全局代理
git config --global http.proxy http://127.0.0.1:8118
git config --global https.proxy http://127.0.0.1:8118

# 查看代理信息
git config --list

# 取消全局代理
git config --global --unset http.proxy
git config --global --unset https.proxy
如果使用全局代理,所有的 git 操作都会使用代理,clone 国内的仓库会变慢,例如 码云 上的代码,因此可以使用局部代理,只对 GitHub 进行代理,这样对国内的仓库不影响。
2.4.2. git 局部代理
# 设置 github 使用 socks5 代理
git config --global http.https://github.com.proxy socks5://127.0.0.1:1080
git config --global https.https://github.com.proxy socks5://127.0.0.1:1080

# 设置 github 使用 http 代理
git config --global http.https://github.com.proxy http://127.0.0.1:8118
git config --global https.https://github.com.proxy http://127.0.0.1:8118

# 查看代理信息
git config --list

# 取消 github 代理
git config --global --unset http.https://github.com.proxy
git config --global --unset https.https://github.com.proxy
2.5. Shell 终端使用代理
在 Shell 终端发起的网络请求现在还不支持 socks5 代理,只支持 http/https 代理。
如果只想在当前终端使用代理,需要在当前终端输入:
export http_proxy=http://127.0.0.1:8118
export https_proxy=http://127.0.0.1:8118
如果想今后所有终端都用代理,需要在 /etc/profile 文件的末尾添加上:
export http_proxy=http://127.0.0.1:8118
export https_proxy=http://127.0.0.1:8118
# 添加完后需要 source /etc/profile
测试代理是否配置成功:
curl www.google.com     # 结果会输出一大堆东西
# 没有安装 curl,可以使用 wget 测试
wget www.google.com     # 结果会下载一个 index.html
2.6. apt 使用代理
虽然 Ubuntu 官方源的 package 在国内有镜像源,例如清华大学镜像源,但是部分自己安装的第三方的软件的软件源在国外,例如 VsCode,使用 apt 获取时速度会很慢甚至直接无法获取,这时可以使用代理对其进行访问。
和终端一样,apt 发起的网络请求不支持 socks5 代理,只支持 http/https 代理。同时虽然 apt 命令是在终端执行的,却不是和终端共享代理配置,需要单独配置。
首先在目录 /etc/apt/apt.conf.d/ 下创建配置文件:
sudo touch /etc/apt/apt.conf.d/01proxy
在 /etc/apt/apt.conf.d/01proxy 文件中给需要代理的源添加设置:
Acquire::http::Proxy::软件源域名 "http://127.0.0.1:8118/";
例如:
# packages.microsoft.com 使用代理
Acquire::http::Proxy::packages.microsoft.com "http://127.0.0.1:8118/";
# ppa.launchpad.net 使用代理
Acquire::http::Proxy::ppa.launchpad.net "http://127.0.0.1:8118/";
软件源的域名可以在执行 sudo apt update 的时候获得,例如 VsCode 的软件源为:
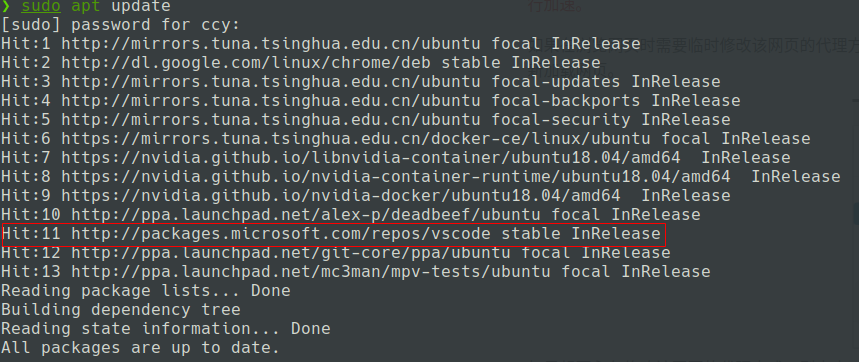
其域名就是 packages.microsoft.com
2.7. snap 使用代理
snap 是 Linux 新一代包管理方式,由于国内目前没有相应的镜像,使得 snap 应用的下载很慢,可以使用代理加速。
snap 支持 socks5 和 http 两种代理方式,配置代理时两者选一个即可,配置方式如下:
# snap 设置 socks5 代理
sudo snap set system proxy.http="socks5://127.0.0.1:1080"
sudo snap set system proxy.https="socks5://127.0.0.1:1080"

# snap 设置 http 代理
sudo snap set system proxy.http="http://127.0.0.1:8118"
sudo snap set system proxy.https="http://127.0.0.1:8118"

# 重启 snap 使代理生效
sudo systemctl restart snapd.service

# 查看 snap 代理
# 注意 如果没有设置过代理 执行下面的命令,将返回错误
sudo snap get system proxy.https && sudo snap get system proxy.http

# snap 取消代理
sudo snap unset system proxy.http
sudo snap unset system proxy.https